How to build a Web App for a Machine Learning model using Flask micro framework?
29 Jan 2018To realize the true benefit of a Machine Learning model it has to be deployed onto a production environment and should start predicting outcomes for a business problem. Most Data Scientists know how to extract data from multiple data sources, combine, clean, and consolidate data, perform feature engineering, extract features, train multiple models, ensemble, validate, and test the models. But what they lack is how to take a trained model onto production.
There are multiple ways to deploy a model in production. However, in this post, we will go through the step-by-step process of creating a basic model and deploy it as a Web App using Flask micro framework - a Python based toolkit. These steps are executed in Windows Operating System. But for Linux, Ubuntu, and other OS, this should work seamlessly by adopting relevant syntax.
Steps:
-
Let us build a simple Machine Learning Model using
irisdataset that is bundled withsklearnpackage. This can be done using Jupyter Notebook, PyCharm, PyTorch or any other IDE that you are comfortable with.
Now that your machine learning model is created and persisted in hard-disk asSVMModel.pckl -
In Windows Command prompt, execute the below command to install Flask framework and its associated dependencies/libraries:
pip install flask gevent requests pillow - Let us create a folder structure as below so that it can be extended to production-like interactive and real-time application later.
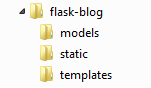
- Root folder
flask-blogcontains server start-up class - Sub-folder
modelscontains pre-trained machine learning models - Sub-folder
staticcontains image, CSS, and JavaScript files - Sub-folder
templatescontains static and dynamic html files
- Root folder
-
Under
flask-blogfolder, create a file calledserver.pywith below content: -
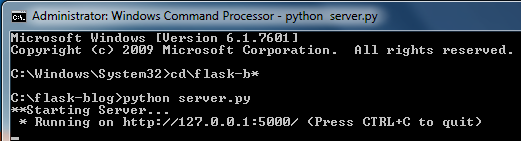
After the above file is created, go to
flask-blogfolder, open a Command prompt, and run the commandpython server.py. It will execute as below:
-
After the server is started successfully, open a browser window, and enter URL
http://127.0.0.1:5000/
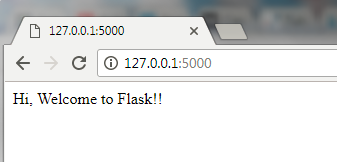 If you get a message Hi, Welcome to Flask!! in your browser, congratulations, your Flask server is up and running successfully! If you get any error or could not get the server up and running, leave a note under the Comments section of this blog and I will get back to you as early as possible.
 -
Having successfully started the server, let us move on to extend
server.pyto predict the new observation using previously trained and stored SVM Model.
Before updating code, go to the Command prompt and stop Flask server usingCtrl-C. Updateserver.pycode as below, or you may simply copy & paste the contents to your code. -
Go to the Command prompt again and start the server using
python server.py. - Once the server is started, open a browser window and enter the URL:
http://127.0.0.1:5000/predict?sepal_length=6.0&sepal_width=2.5&petal_length=5.5&petal_width=1.6
Voila! The predicted class of Iris will appear on the screen as above. Play around by changing the values of features in the URL query string.
Now that you understand how a machine learning model can be created, persisted onto a disk, loaded from disk, can extract features from a browser request, and can use the model to predict the class using those features.
This application can be extended with fancy UI containing form element, dropdown boxes, submit button, etc..